We may earn money or products from the companies mentioned in this post.
Hey there, if your kitchen faucet isn’t flowing as freely as it used to, it’s probably time for a deep cleaning. Mineral buildup, grime, and hard water deposits can clog the tiny holes and channels in your faucet head, reducing water flow over time. Not to worry, we’re here to walk you through how to get your kitchen faucet head sparkling clean and working like new again. This simple step-by-step process only takes about 15 minutes and requires a few basic household items you likely already have on hand. By the time you’re done, your faucet will be gunk-free and running perfectly. So roll up your sleeves, grab a few supplies, and let’s get cleaning that kitchen faucet head!
Why It’s Important to Clean Your Kitchen Faucet Head
Why It’s Important to Clean Your Kitchen Faucet Head
A clean kitchen faucet head is essential for several reasons:
Prevents Buildup
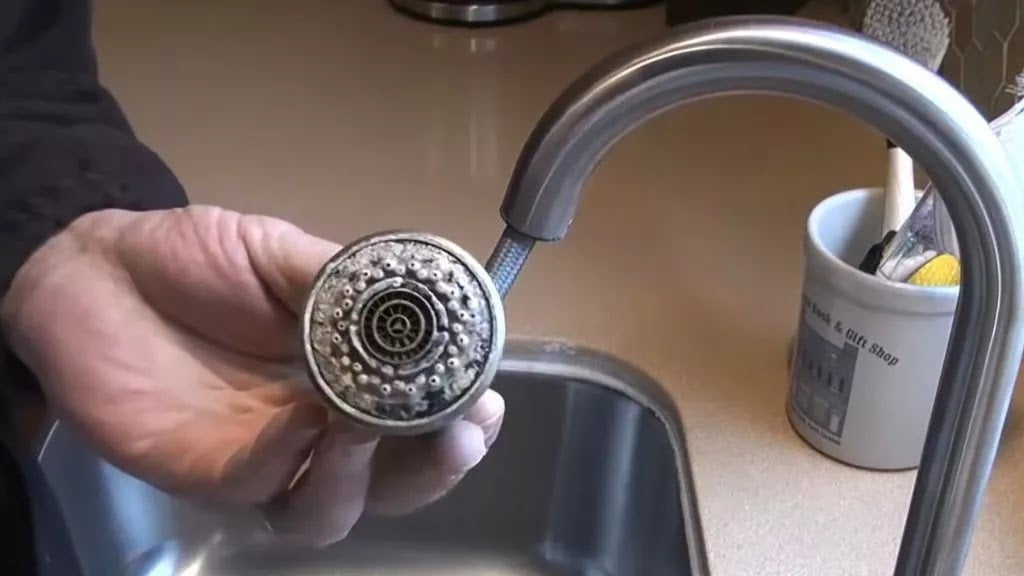
Mineral buildup, grime, and sediment can accumulate in and around your faucet head over time, clogging the tiny holes and aerators. This buildup reduces water flow, prevents your faucet from functioning properly, and just looks gross. Regular cleaning helps remove any gunk and keeps your faucet performing like new.
Improves Appearance
A dirty, grimy faucet head is unpleasant to look at and can make your whole kitchen seem unclean. By scrubbing away any surface stains, stuck-on splatters, and water spots, you’ll have a faucet head that looks as good as the day you bought it.
Extends Lifespan
The buildup of mineral and sediment deposits puts extra stress on your faucet components, causing them to wear out faster. Frequently cleaning your faucet head helps remove these deposits, reducing strain on internal parts and ensuring your faucet lasts as long as possible.
Enhances Water Flow
When tiny holes and aerators get clogged, your faucet can’t provide the strong, steady water flow you’re used to. Cleaning removes any blockages, allowing water to flow freely again at the expected rate and pressure.
In summary, keeping your kitchen faucet head clean has many benefits and is well worth the small amount of effort required. Now that you know why it’s so important, let’s get into the how-to details for properly cleaning your kitchen faucet head.
Supplies You’ll Need for Cleaning Kitchen Faucet Head
To clean your kitchen faucet head, you’ll need to gather a few basic supplies:
- White vinegar: Vinegar is a natural dissolvent that helps loosen mineral buildup and grime clogging your faucet head. Plain white vinegar will work great for this.
- Ziploc bags: You’ll need sealable plastic bags to immerse your faucet heads in the vinegar. Quart-sized bags should work for most standard faucet heads.
- Rubber bands or twist ties: Use these to securely seal the bags around the faucet bases to prevent any leaks.
- Soft scrub brush: A non-abrasive scrub brush is ideal for scrubbing away any stuck-on debris after soaking. Look for a brush specifically designed for cleaning faucets and other plumbing fixtures.
- Clean rags: Have some clean cloths on hand to wipe down your faucet heads after scrubbing and to dry all parts before reassembling your faucet.
Removing Mineral Buildup
If your faucet head seems clogged with hard water stains or mineral deposits, soaking it in vinegar will help loosen the buildup. Unscrew the retaining clip or retaining ring holding the faucet head in place and remove the spray face or filter screen. Place the parts in a sealable plastic bag and pour in enough white vinegar to submerge them. Seal the bag and let soak overnight.
The next day, pull out the parts and scrub with an old toothbrush to remove any remaining debris. Rinse all parts with water and reassemble your faucet. Turn on the water to rinse away any remaining vinegar and test your faucet to ensure full flow has been restored. Your faucet head should now be clean as new and working properly. With regular cleanings, you can keep your kitchen faucet in tip-top shape.
Step-by-Step Process for Cleaning Kitchen Faucet Head
Cleaning your kitchen faucet head is an important part of keeping your kitchen clean and functional. Mineral buildup and grime can clog the tiny holes in the faucet head, reducing water flow and pressure. Here’s how to give your faucet head a deep clean.
Gather Your Supplies
You’ll need a few basic supplies: white vinegar, a resealable plastic bag, and an old toothbrush. The vinegar is great for dissolving mineral deposits, and the bag and toothbrush will help scrub away any stuck-on debris.
Soak the Faucet Head in Vinegar
Unscrew your faucet head and remove any attached sprayers or hoses. Place the faucet head in a resealable plastic bag and pour in enough white vinegar to submerge it. Seal the bag and let it soak for 2 to 3 hours so the vinegar can break down any built-up minerals. The longer it soaks, the better.
Scrub with an Old Toothbrush
After soaking, remove the faucet head from the vinegar and scrub off any debris with an old toothbrush. Pay extra attention to any small holes or mesh filters. Rinse well with water to remove any remaining vinegar or loosened particles.
Reassemble and Test
Reattach your faucet head, sprayer, or hose, and turn on the water. Run the water for a few minutes to rinse away any remaining residue. Check that the water flow and pressure have improved and that all parts are functioning properly with no drips or leaks.
Optional: Repeat if Needed
For stubborn mineral buildup, you may need to repeat the soaking and scrubbing processes. You can also scrub the faucet head with an abrasive sponge or scrubber to remove tough deposits before soaking it again in vinegar. With regular cleaning, your faucet head should stay clear and provide optimal water flow.
Keeping your kitchen faucet head clean and functioning properly is important for efficiency and hygiene. A simple DIY clean using vinegar and a toothbrush can help ensure clean, clear water is flowing freely from your kitchen faucet. Stay on top of buildup and grime by cleaning your faucet head every 3-6 months, or if you notice a drop in water pressure.
Tips for Preventing Buildup on Your Faucet Head
To prevent buildup on your faucet head, follow these helpful tips:
Use a water softener
If you have hard water, consider installing a water softener. Hard water contains high amounts of minerals like calcium and magnesium that can build up on your faucet over time. A water softener helps reduce these minerals, preventing buildup before it starts.
Wipe down your faucet after each use
Make it a habit to wipe down your kitchen faucet with a clean, soft cloth after each use. This simple step removes any drips, splatters, or spots of water left behind on the surface of the faucet that could eventually build up and become hard to remove if left to sit. Dry your faucet off completely to prevent water spots.
Rinse your faucet with vinegar
Once a week, rinse your kitchen faucet with undiluted white vinegar. Vinegar is great at dissolving hard water buildup and mineral deposits. Pour a few cups of vinegar over your faucet and let it sit for several minutes. Scrub with an old toothbrush to loosen any stuck-on buildup. Rinse well with water and dry your faucet with a soft cloth to buff and shine.
Use a commercial limescale remover
For tough buildup on your kitchen faucet, use a commercial limescale remover or de-scaler according to the directions on the product. Spray it on, let it sit, and then scrub off the buildup with an abrasive sponge or scrubber. Be sure to rinse and dry your faucet thoroughly after using any chemical product.
- • Avoid harsh chemicals that could damage the finish. Test in an inconspicuous area first.
- • For a natural de-scaler, make a paste from baking soda and water and scrub with the paste using a sponge or scrubber.
By following these useful tips for preventing buildup, you’ll keep your kitchen faucet sparkling clean and working like new. Consistency is key, so try to implement one or more of these tips as part of your regular kitchen cleaning routine.
Conclusion
So there you have it, a quick and easy way to get your kitchen faucet head sparkling clean again. Now you’ll be able to turn on your faucet without worrying about gunk buildup or water spots. Your kitchen will look and function like new. And the best part is, with regular maintenance like this, you’ll be able to keep your faucet head clean and prevent major buildup for good. So put on some music, grab your supplies, and get cleaning – your faucet and kitchen will thank you!
More kitchen Faucets recommendations
- Top 10 The Best Luxury Kitchen Faucets for Every Budget
- What Is the Highest GPM Kitchen Faucet? Meet the Moen Arbor
- Best Gold Kitchen Faucets of 2023: Top 5 Picks for a Luxurious Look
- Waypoint Cabinets vs KraftMaid: Which is the Better Choice?
- American Woodmark Cabinets: Real Customer Reviews
- Midea Appliances Reviews: What Customers Are Saying
- The Best High-End Kitchen Faucets for Every Budget
- Allen and Roth Kitchen Faucet With LED Light:
- How to install a Moen Kitchen Faucet With Sprayer
- How to Install a Kohler Kitchen Faucet: A DIY Tutorial