We may earn money or products from the companies mentioned in this post.
So your old kitchen faucet has seen better days, and you’ve decided it’s time for an upgrade. Installing a new faucet yourself may seem intimidating, but with some basic tools and a little patience, you’ve got this. Replacing a kitchen faucet is actually a pretty straightforward DIY project that you can accomplish in less than an hour. Don’t worry, we’ve got you covered in this step-by-step guide. By the end, you’ll be enjoying your new kitchen faucet and the satisfaction of a job well done. Before you know it, you’ll be looking for other little upgrades to tackle around the house!
Tools and Materials Needed
To install a new kitchen faucet, you’ll need a few essential tools and supplies.

Supplies:
- New kitchen faucet (duh!)
- Supply lines (the hoses that connect the faucet to the water supply)
- Plumber’s putty or silicone caulk
- Adjustable wrench
- Basin wrench
- Flashlight
- Towels or rags
Tools:
- Adjustable wrench – For tightening the mounting nuts that hold the faucet in place
- Basin wrench – Specifically designed for tightening nuts in awkward, cramped areas like under a sink
- Flashlight – It will likely be dark under there, so a flashlight helps you see what you’re doing!
- Towels – Useful for wiping up any drips or spills during installation
You’ll also want to turn off the water supply before starting and be prepared for some drips – it’s a good idea to place towels in and around the sink. Make sure to check if your counter already has pre-drilled holes for the faucet before purchasing putty or caulk. If not, the putty will help create a watertight seal between the faucet and the counter.
With the right tools and supplies in hand, you’re ready to install your new kitchen faucet! The actual installation is fairly straightforward, but having everything organized beforehand will make the process go as smoothly as possible. Take your time and be patient – your new faucet will be making your kitchen more functional in no time!
Shut Off the Water Supply
To get started, locate the shutoff valves under or near the sink. They’ll control the water supply to the faucet. Turn the hot and cold water valves clockwise to shut off the water.
Now it’s time to disconnect the lines. Place a bucket or pan below the faucet to catch any remaining water in the pipes. Use pliers or a wrench to loosen the nuts connecting the hot and cold water lines to the faucet. Unscrew by turning counterclockwise and removing the lines.
Next, disconnect the sprayer hose if your old faucet has one. Unscrew the retaining clip or nut that secures the hose to the faucet and remove the hose.
At this point, you should have the old faucet free from all connections and water lines. Use a towel to wipe up any spilled water around the area. Now double-check that the water is off by turning on the old faucet to release any built-up pressure.
Installing the New Faucet
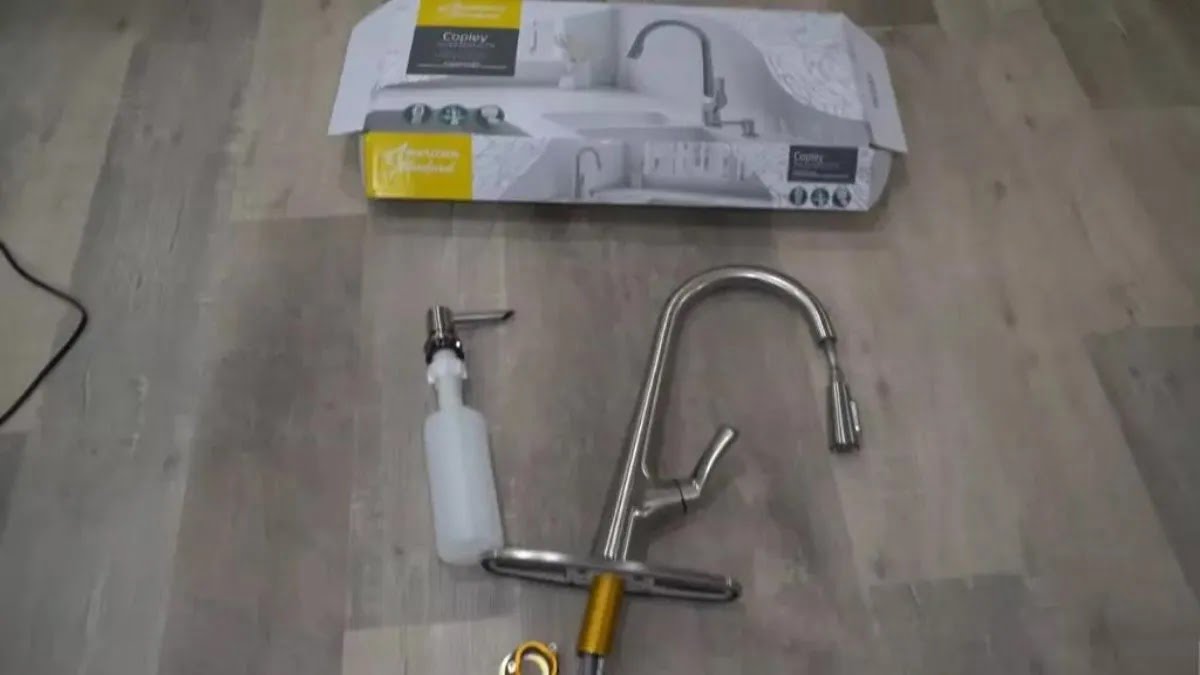
Unpack your new faucet and check that all parts are included in the box. Follow the included instructions to assemble the faucet. Once assembled, feed the water lines up through the sinkhole.
Hand-tighten the mounting nuts that hold the faucet in place. Make sure the new faucet is centered and the handles turn freely before tightening completely. Connect the hot and cold water lines by screwing on the coupling nuts.
Turn the water back on and check for any leaks. Tighten any connections as needed. Connect the sprayer hose if your new faucet has one. Turn on the new faucet to flush out the lines.
Congrats, your new kitchen sink faucet is installed and ready to use! Be sure to turn it on and off a few times to ensure proper functioning before using it. With some basic tools and patience, you’ve saved the cost of a plumber. Enjoy your upgraded kitchen!
Remove Existing Faucet
Now that you have the necessary tools and parts, it’s time to remove your existing faucet. This may seem daunting, but by taking it step-by-step you’ll have the old faucet out and the new one installed in no time.
First, turn off the hot and cold water supply lines under the sink. Locate the water shutoff valves—they’ll either be copper tubes with valve handles that turn clockwise to shut off, or more modern lever-style valves. Give the valve handle a turn to ensure the water is off.
Next, place the bucket underneath the sink to catch any remaining water in the lines. Then disconnect the water supply lines from the faucet. You may need pliers or a wrench to loosen the compression nuts that connect the lines to the faucet. Have towels handy to wipe up drips and spills.
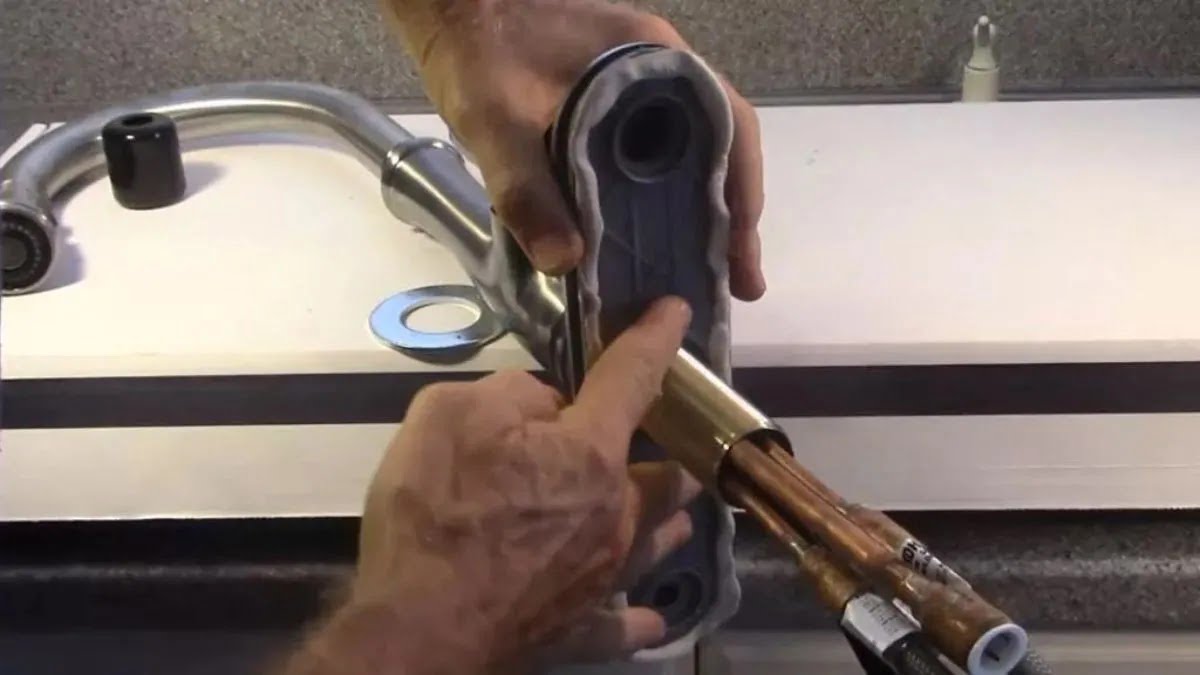
Now remove any mounting hardware currently holding your faucet in place. This is usually an adjustable wrench or basin wrench to loosen the mounting nuts and mounting clips or brackets under the sink. Pull the faucet up and out.
You may also need to remove your sprayer or soap dispenser at this point. Disconnect the hose for the sprayer and unscrew any mounting hardware holding the dispenser under the counter.
Clean the area around the sink opening and check for any damage before installing the new faucet. Run a bead of plumber’s putty around the base to create a water-tight seal.
Connect the water supply lines and mounting hardware, then turn the water back on slowly. Check for any leaks and tighten as needed. Once everything looks good, turn the water on fully and test your new faucet! Flush the water lines by running the hot and cold water for at least 60 seconds each.
Installing a new kitchen faucet may seem complicated, but by disconnecting the water supply, removing the existing hardware piece by piece, and installing the new faucet step-by-step, you’ll have your shiny new fixture in place in no time. The improved functionality and style will make the effort well worth it!
Prepare the New Faucet
Now that you have the necessary tools and parts, it’s time to prepare the new faucet for installation.
Attach the Sprayer Hose
If your new faucet includes a pull-down sprayer, attach the sprayer hose to the faucet body at this point. The hose will have a weight attached to one end to keep it in place. Feed the hose down through the center hole in the sink. Attach the weighted end of the hose to the clip or holder that comes with the faucet to keep the hose secured under the sink when not in use.
Connect the Water Supply Lines
Hand-tighten the hot and cold water supply lines to the correct hot and cold ports on the faucet base. The hot side will usually be labeled. Make sure not to cross the lines. The supply lines allow water to flow from the shutoff valves to the faucet.
Attach the Faucet to the Sink
Place a bead of plumber’s putty around the base of the faucet. Putty will help create a water-tight seal between the faucet and the sink. Place the faucet onto the sink, aligning the supply lines and sprayer hose. Press down firmly.
Secure the Faucet
Under the sink, slide the washers and mounting nuts onto the supply lines and hand-tighten them onto the threaded faucet shanks until snug. Then tighten another half-turn with pliers or a basin wrench. Do not overtighten, as this can damage the faucet.
Turn the Water Back On
Turn the hot and cold water supplies back on and check for any leaks in the connections or drains. Tighten as needed. Run the water for a few minutes to flush out any debris. Your new faucet is ready to use! Be sure to caulk around the base of the faucet with waterproof caulk or silicone sealant to help prevent water damage to your countertop.
Install the New Faucet Base or Escutcheon Plate
Now that you have the old faucet removed, it’s time to install the base plate for your new faucet, also known as the escutcheon plate. This plate covers the extra space around the faucet base and provides a finished look.
Attach the Faucet Base
Place the new faucet over the sinkhole to ensure it lines up properly. Once aligned, feed the supply lines down through the sinkhole. Apply the plumber’s putty around the base of the faucet according to the package directions. Press the faucet firmly into place over the putty.
Wipe away any excess putty that squeezes out from under the faucet base with a damp rag. Allow 15 to 20 minutes for the putty to dry completely. This will ensure a watertight seal and prevent leaks.
Secure the Faucet
Locate the mounting nuts or mounting brackets under the sink that secure the faucet in place. Hand-tighten the nuts at first. Then use a basin wrench or pliers to fully tighten the nuts. Be very careful not to overtighten, as this can damage your new faucet.
Once the faucet feels snug and secure, turn the water back on and check for any leaks. Tighten nuts as needed. Run water for a few minutes to clear any debris.
Attach the Escutcheon Plate
Place the escutcheon plate over the supply lines and mounting bracket. Hand-tighten the screws to attach the plate. Use a screwdriver to fully tighten the screws. Wipe away any remaining plumber’s putty.
Turn on the water supply and test your new faucet to ensure there are no leaks and that hot and cold water are functioning properly. Congratulations, your new kitchen faucet is installed and ready to use! Be sure to turn the water back on at the shutoff valves under the sink.
Connect the Water Supply Lines
Now that you have the old faucet removed and have confirmed the new faucet will fit, it’s time to connect the water supply lines. This step will ensure your new faucet has running hot and cold water.
Turn Off the Water Supply
Locate the shutoff valves under or near your sink and turn them clockwise to cut off the water. Have towels ready in case any water is left in the lines.
Attach Water Supply Lines
Your new faucet will come with hot and cold water supply lines. Attach the lines to the correct hot and cold ports on the faucet base according to the instructions. Hand-tighten the connections.
Connect to Shutoff Valves
Connect the other ends of the hot and cold water supply lines to your home’s shutoff valves. Again, hand-tighten these connections.
Turn the Water Back On
Slowly turn the shutoff valves counterclockwise to restore the water supply. Check for any leaks at the connections. Tighten as needed with pliers or a wrench.
Test Your Work
Turn on both the hot and cold water taps to flush out any debris in the lines. Run the water for at least 30 seconds. Next, turn off the taps and check all connections again for leaks or drips. Tighten if needed.
Insulate (Optional)
If your supply lines are exposed, you may want to insulate them to prevent heat loss and conserve energy. You can purchase pre-cut foam pipe insulation tubes that simply slide over the lines and zip closed.
Following these steps carefully will ensure your new kitchen faucet is properly connected and ready to use. Take it slow and be patient – a DIY plumbing job well done will give you satisfaction for years to come whenever you use your new faucet. Let the water flow!
Connect the Spray Hose
Once you have the old faucet removed and have confirmed the new faucet will fit, it’s time to connect the spray hose. The spray hose is what provides the “pull-out” sprayer functionality.
Attach the Spray Hose to the Faucet Spout
The spray hose will have a brass or nylon braided hose that attaches to the bottom of the faucet spout. Locate the spray hose—it will have a brass or nylon braided hose on one end and a spray head on the other. Attach the hose end of the sprayer to the bottom of the faucet spout. Hand-tighten it and then use pliers to tighten it another 1/4 turn. Be very careful not to overtighten, or you may damage the faucet.
Thread the Spray Hose Through the Sink
Next, you need to thread the spray hose down through the sink opening so the spray head will sit in the sink basin. The hose is usually long enough that you’ll have plenty of slack under the sink. Guide the hose through the sink opening, feeding the slack down into the cabinet underneath as needed.
Connect the Water Supply Lines
With the spray hose attached and threaded, you can now connect the water supply lines to the faucet inlets. The hot water supply line attaches to the left inlet, and the cold water supply line attaches to the right inlet. Hand-tighten the supply lines and then use pliers to tighten them another 1/4 turn. Again, be very careful not to overtighten.
Turn the Water Back On
Turn the water supply back on and check all connections for any drips or leaks. Tighten as needed. Run the water through the faucet, checking that the hot and cold are correctly positioned. Check that the spray hose and head are functioning properly. Once everything is confirmed leak-free and working well, you can turn the water back on under the sink.
Congratulations, your new kitchen faucet is installed and ready to use! Be sure to wipe away any debris and test all functions before using. Enjoy your upgraded kitchen sink experience!
Turn the Water Back On
Now that your new faucet is installed, it’s time to turn the water back on and test it out! But before you do, there are a few final checks to make.
Double-check that the hot and cold water lines are connected to the correct faucet inputs. If they’re reversed, you’ll end up with scalding water coming out of the “cold” side! It’s an easy mistake to make, so take a second to ensure red connects to hot and blue connects to cold.
Ensure all connections are tight. Go around and tighten each of the nuts that secure the water lines to your faucet and shut off valves. Even slightly loose connections can lead to drips and leaks.
Turn the shut-off valves back to the open position. Locate the shut-off valves under your sink that control the hot and cold water lines. Slowly turn each valve counterclockwise to open the flow of water to the new faucet.
Check for any leaks or drips and tighten as needed. Run both the hot and cold water for a few minutes to flush out any debris in the lines. While the water is running, inspect all connections for signs of water dripping or pooling. Tighten nuts or seals as required to fix any leaks before they get worse.
Test your new faucet to ensure proper hot/cold temperature and water pressure. If anything seems off, it’s best to address it now before the installation is complete. Make minor adjustments to the water lines or consult the faucet instructions to remedy any issues.
Once everything checks out, you can breathe a sigh of relief—your new kitchen faucet installation is finished! No more leaks or faulty hardware to deal with. Enjoy your upgraded faucet and the improved functionality it brings to your kitchen sink. If any issues come up down the road, don’t hesitate to revisit this guide or contact a plumber for help. With the hard part done, you can now appreciate how a small improvement makes a big difference.
Test and Tighten All Connections
Now that your faucet is installed, it’s time to test all the connections and ensure everything is working properly before using your new faucet.
Turn the water supply back on and check under the sink for any leaks or drips. Tighten any connections that are leaking. It’s best to do this before turning on the new faucet.
Test Hot and Cold Water
Turn on the hot and cold water at the faucet to check that they are working correctly. The hot water should be on the left side and the cold water on the right side. Run both for a full minute to flush out any debris.
Check that the water temperature is right – the hot water should be hot and the cold water should be cold. If they seem reversed, you may need to reconnect the hot and cold water supply lines under the sink.
Check Sprayer
If your new faucet includes a pull-down sprayer, test to make sure it’s working properly. Pull the sprayer from the spout to extend the hose and check that water flows freely. Make sure the sprayer hose retracts smoothly when done.
Tighten Connections
Go back under the sink to tighten all water supply line connections with a wrench or pliers. Tighten firmly but do not overtighten. Check for any additional drips or leaks and tighten as needed.
Turn the water back on and test your new faucet by running the water for a few minutes. Check connections under the sink again for leaks. Once everything looks good and watertight, your new kitchen faucet should be good to go. Be sure to turn the water supply back on fully when done.
If any issues come up during testing or over the next few days, you may need to consult your faucet installation manual or manufacturer’s support to troubleshoot. But by taking the time to properly test and tighten all connections, you’ve given your new kitchen faucet plumbing the best chance at success. Enjoy your upgraded kitchen sink!
Conclusion
That’s it, you’re done! Not too tricky, right? A little time and patience and you now have a stylish new faucet that will make your time in the kitchen more enjoyable. No more drips or hard-to-turn handles. And just think, you did it yourself and saved the cost of a plumber. Feel free to admire your handiwork – you deserve it. The next time a home improvement project comes up, you can go into it with confidence. If you can handle installing a kitchen faucet, you’re ready to tackle all sorts of tasks. Great work! Now go enjoy your upgraded kitchen and a well-deserved beverage of your choice. You’ve earned it.
More kitchen Faucets recommendations
- Top 10 The Best Luxury Kitchen Faucets for Every Budget
- What Is the Highest GPM Kitchen Faucet? Meet the Moen Arbor
- Best Gold Kitchen Faucets of 2023: Top 5 Picks for a Luxurious Look
- Waypoint Cabinets vs KraftMaid: Which is the Better Choice?
- American Woodmark Cabinets: Real Customer Reviews
- Midea Appliances Reviews: What Customers Are Saying
- The Best High-End Kitchen Faucets for Every Budget
- Allen and Roth Kitchen Faucet With LED Light:
- How to install a Moen Kitchen Faucet With Sprayer
- How to Install a Kohler Kitchen Faucet: A DIY Tutorial