We may earn money or products from the companies mentioned in this post.
Have a leaky faucet driving you crazy? Tired of waiting for the plumber or paying an arm and a leg to get it fixed? Well, listen up, because you’ve come to the right place. Installing a new kitchen faucet is easier than you think, and with a little patience, you can do it yourself. In this tutorial, we’ll walk you through the step-by-step process for installing a Kohler kitchen faucet. With some basic tools and a DIY spirit, you’ll be enjoying your new faucet in no time. Who needs a plumber when you have the power of the internet? By following this guide, you’ll gain useful skills and save money. So grab your wrench and let’s get started!
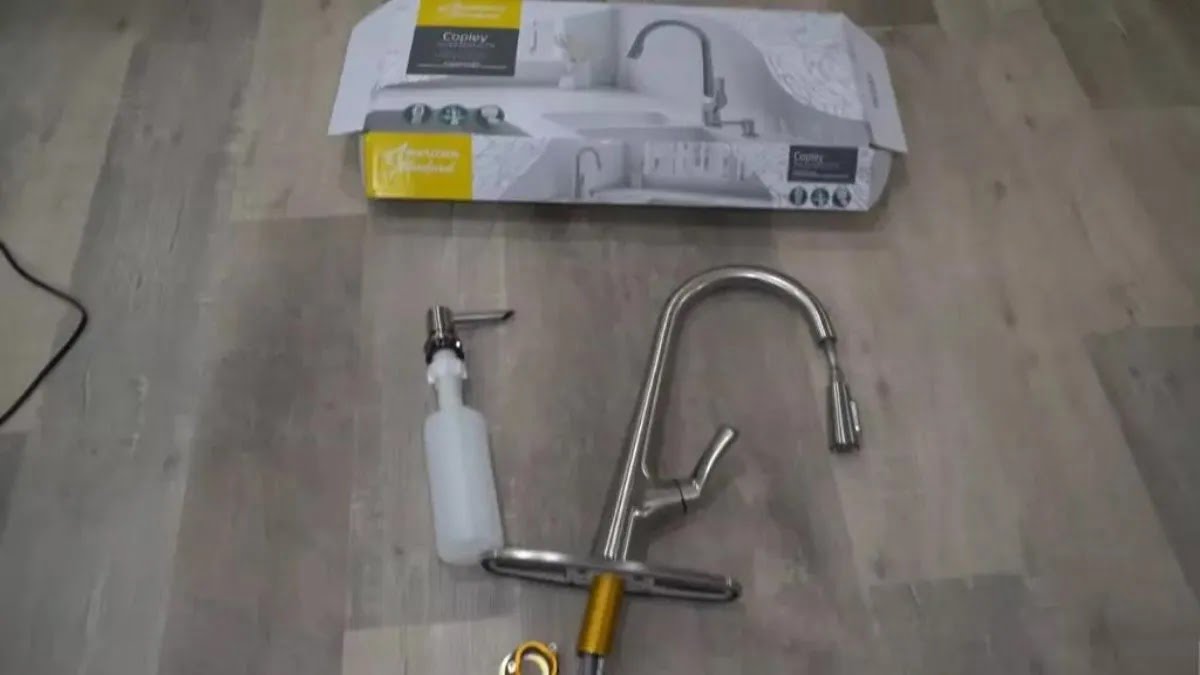
What You’ll Need to Install a Kohler Kitchen Faucet
To install your new Kohler kitchen faucet, you’ll need a few basic tools and parts.

First, gather the following supplies:
- Adjustable wrench or pliers
- Basin wrench (if installing a deck plate)
- Silicone sealant
- Flashlight
- Allen wrenches/hex keys (if your faucet requires them)
- Plumber’s putty (for sinks with uneven mounting surfaces)
You’ll also want to have handy the parts that came with your Kohler faucet, including:
- Faucet assembly
- Water supply lines
- Deck plate (if your sink has separate holes for the faucet and sprayer)
- Escutcheon plate (for sinks with uneven mounting surfaces)
- Anchors and mounting hardware
Before starting, turn off the water supply to your sink by locating the shutoff valves under or near the sink. Then turn on the faucet to drain any remaining water from the lines.
Time to Install
With your tools and parts gathered and the water shut off, you’re ready to install your new kitchen faucet. The basic steps are: remove your old faucet, clean the sink surface, install a new plumber’s putty or a deck plate if needed, secure the new faucet in place, connect the water supply lines, and turn the water back on to test your work.
If you run into any issues or have additional questions, be sure to check your faucet model’s installation guide or Kohler’s support site. With a little patience, you’ll be enjoying your new Kohler kitchen faucet in no time!
Turn Off the Water Supply
The first thing you’ll want to do is turn off the water supply to your kitchen faucet. Locate the shutoff valves under or near the sink and turn them clockwise to close. If you have a single water shutoff valve for your entire house, turn that off instead.
Now comes the fun part – removing your old faucet! Start by disconnecting the water lines. Place a bucket underneath to catch any remaining water in the lines. Use pliers or a wrench to unscrew the nut connecting the water lines to the faucet. Remove any mounting nuts or screws holding the faucet to the sink. You may need to cut the old putty around the base of the faucet to pry it off.
Prepare the new faucet
Take your new Kohler faucet out of the box and inspect it to ensure there are no missing or damaged parts. Attach the water supply lines, sprayer hose (if applicable), and mounting hardware like nuts or screws that came with your faucet. Apply a bead of plumber’s putty around the base of the faucet according to the directions in the guide.
Install and test
Place your new faucet over the holes in the sink, and add the mounting nuts and mounting screws to secure it in place. Tighten everything firmly with your wrench and pliers. Turn the water back on and check for any leaks. Turn on the faucet to flush out any debris. Congratulations, you now have a stylish new Kohler kitchen faucet! With some patience and the right tools, installing a kitchen faucet yourself can be a rewarding DIY project.
Remove the Existing Faucet
To install your new Kohler kitchen faucet, you’ll first need to remove your existing faucet. This may sound challenging, but with some basic tools and patience, you can do it yourself.
Turn Off the Water Supply
The first step is to locate the shutoff valves under or near your sink and turn off the water supply. This will prevent water from spraying out when you disconnect the faucet lines. If you have a single-handle faucet, there will be two valves—one for hot water and one for cold. For a two-handle faucet, turn off both valves.
Disconnect the Supply Lines
Next, disconnect the hot and cold water supply lines from the faucet using a wrench or pliers. Place a bucket below to catch any remaining water that drips out. Be very careful not to strip the nuts that connect the lines. Wrap the ends of the lines with towels to prevent scratching the sink surface.
Remove the Mounting Hardware
Look underneath your existing faucet to determine how it’s mounted. Many are secured in place using mounting nuts that you access from below the sink. Use a basin wrench or locking pliers to loosen these nuts and remove them. For faucets mounted using mounting rings or plates, locate the screws securing them in place, and remove them with a screwdriver.
Take Out the Old Faucet
Now you can lift out your old faucet from the sink deck or countertop. Clean the area thoroughly to remove any debris or buildup before installing your new Kohler faucet.
Extra Helpful Tips
- • Call a plumber if you have any issues turning off the water supply or run into corroded or stuck supply lines. It’s best to avoid potential flooding or water damage.
- • Place a towel in the bottom of the sink to prevent dropped tools and parts from scratching the surface.
- • Take photos or label supply lines and mounting hardware as you disassemble them to aid in reinstallation.
- • Keep a bucket, rags, and plumber’s putty on hand in case of any drips or leaks during the removal process.
With the old faucet removed, you’re ready to install your new Kohler kitchen faucet. Take your time and exercise patience—you’ve got this! The results will be well worth the effort.
Clean and Dry the Sink Area
Now that you have the necessary tools and parts ready, it’s time to prepare the area around your sink for the new faucet installation.
Clean the Sink Surfaces
Clean your sink thoroughly to remove any dirt or debris. Wipe down the countertops surrounding the sink as well. You want a clean workspace so no gunk ends up in your new faucet components. Use an all-purpose cleaner or degreaser and scrub away any stuck-on messes. Rinse well with water and dry completely.
Shut Off the Water Supply
Locate the shutoff valves under or near your sink and turn them clockwise to shut off the water. This will prevent water from spraying out when you detach the old faucet. If you have a garbage disposal, shut that off at the wall switch as well.
Remove Existing Faucet and Drain Connections
Loosen the coupling nuts that secure your old faucet to the water supply lines with pliers or a wrench. Unscrew the mounting nuts under the sink that hold the faucet in place. Lift out the old faucet. Now remove the drain stopper in your sink and detach the drain pipe underneath. You may need a pipe wrench to loosen the compression nuts that connect the drain.
Dry the Mounting Surface
With your old faucet and drain removed, thoroughly dry any remaining water around the faucet mounting holes in your sink. Moisture on the mating surfaces can prevent the new faucet from sealing properly. Wipe away any putty or plumber’s epoxy remaining from your previous installation. Your sink should be squeaky clean and bone dry for the new faucet to install correctly.
Take your time preparing the area and shutting off the water supply. A smooth installation starts with a clean, dry work environment. Once complete, you’re ready to unpack your new Kohler faucet and install it according to the manufacturer’s directions. With some patience, you’ll be enjoying your new kitchen faucet in no time!
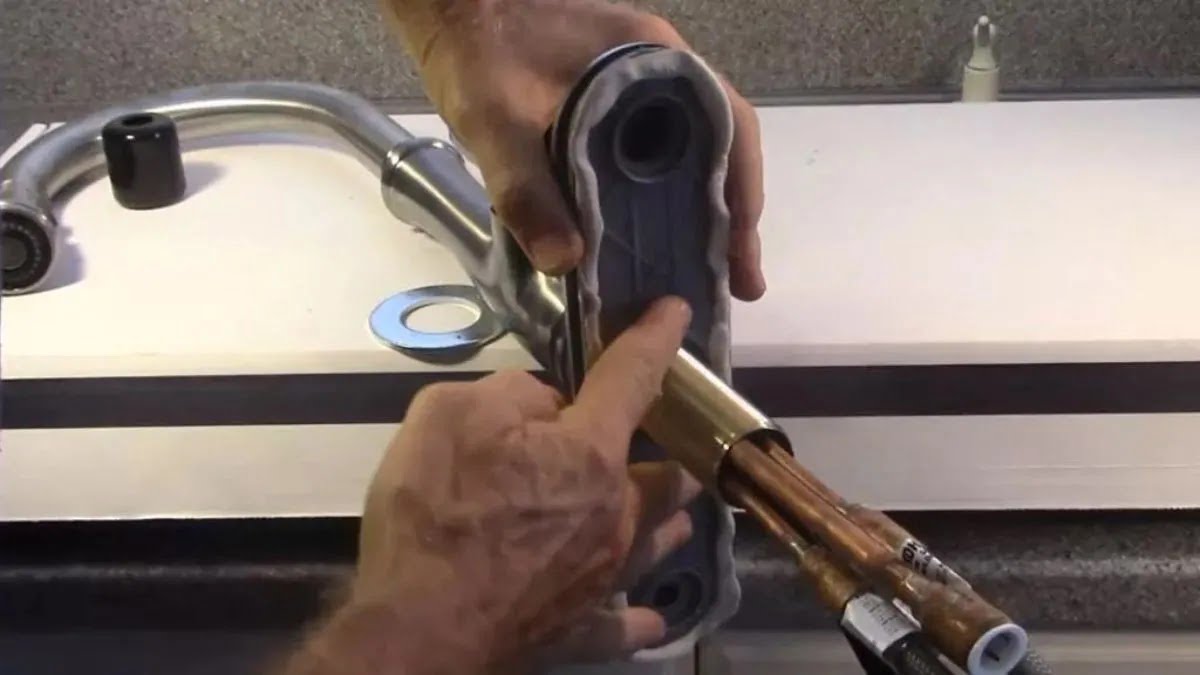
Install the Faucet Base or Escutcheon
To install the faucet base or escutcheon, you’ll need to first prepare the area for installation. Make sure to turn off the water supply lines under the sink before starting. You should also place a bucket or pan below the installation area to catch any water remaining in the lines.
Remove Existing Faucet
If there’s an existing faucet already installed, you’ll need to remove it completely. Turn off the hot and cold water supply lines and disconnect them from the faucet. You may need to use a wrench or pliers to unscrew the lines. Remove any mounting nuts or screws holding the old faucet in place. Clean the area thoroughly to remove any debris before installing the new faucet.
Install Mounting Hardware
Your new Kohler faucet will come with mounting hardware like washers, nuts, and possibly a mounting ring or bracket. Slide any washers or rings over the water supply lines and mounting shank or threads. Place the faucet in the position you want over the sink holes or countertop cutout.
Connect Water Supply Lines
Hand-tighten the mounting nuts to hold the faucet in place, then connect the hot and cold water supply lines. Make sure the hot water line goes to the correct faucet inlet marked with an “H”. Tighten the lines with a wrench, taking care not to twist or kink them.
Tighten Mounting Nuts
Once the water supply lines are secure, you can fully tighten the mounting nuts under the sink to firmly attach the faucet. Tighten them in an alternating pattern, securing the faucet evenly and avoiding an off-center installation. Double-check that all connections are tight, with no drips or leaks before turning the water back on.
Turn the Water Back On
When you’ve verified there are no leaks or other issues, you can turn the water supply lines back on under the sink. Check connections again for any new drips or leaks. Run some water from the new faucet to remove any debris in the lines. Your DIY Kohler kitchen faucet installation is now complete. Enjoy your new faucet!
Add Plumber’s Putty to the Base
The base of your new Kohler kitchen faucet needs to have a watertight seal to prevent leaks under your sink. Plumber’s putty is a pliable compound used to fill gaps and form seals around plumbing fixtures like faucets. You’ll want to apply it before installing the faucet base.
Purchase plumber’s putty from your local hardware store. It comes in cylindrical containers and has a clay-like consistency. Remove a portion and knead it with your hands until it’s soft and pliable.
Clean the area around the faucet hole(s) in your sink to remove any debris. Place the putty around the edge of the base of your Kohler faucet. Use your fingers to spread it out into an even layer. Make sure any ridges, gaps, or imperfections in the sink surface are filled in completely.
Mount the faucet base onto the sink. Press down firmly so the putty seals and adheres to both the base and the sink. Tighten the faucet base into place according to the instructions provided.
Wipe away any excess putty from around the base with a damp rag or sponge. Run some water to check for leaks and tighten as needed. The putty will dry and harden over the next few hours to create an airtight, watertight seal.
Putty alternatives like silicone caulk can also be used, but plumber’s putty is non-toxic, inexpensive, and creates a very durable seal for kitchen and bathroom applications. For a quick DIY task, it’s an essential tool to have on hand. With the putty applied, you’re ready to move on to connecting the water supply lines and testing your new Kohler kitchen faucet.
Secure the Faucet to the Sink
Now that you have the old faucet removed and have ensured the new Kohler faucet will fit your sink, it’s time to install it. For this step, you may need an adjustable wrench, plumber’s putty, mounting nuts, and supply lines.
First, apply a thick ring of plumber’s putty around the base of the faucet. This will create a waterproof seal between the faucet and the sink. Place the faucet in the center hole of the sink and press down firmly.
Next, slide the mounting nuts and washers onto the supply lines. Hand-tighten the nuts to secure the faucet in place. Once positioned properly, fully tighten the nuts with the adjustable wrench. Wipe away any excess putty around the base of the faucet.
Connect the water supply lines to your hot and cold shutoff valves. The lines are usually color-coded – red for hot and blue for cold. Tighten the connections with the adjustable wrench.
Turn the water back on at the shutoff valves and check for any leaks in the connections or around the base of the new faucet. Tighten as needed. Run the water for a few minutes to clear any debris.
Your new Kohler kitchen faucet is now installed and ready to use! Be sure to turn it on and off a few times to ensure free and easy movement. Over time, the plumber’s putty seal may need to be reapplied or replaced. Periodically check for leaks or drips and tighten the supply line connections.
With some patience and the proper tools, installing a kitchen faucet is a doable DIY task. Take pride in upgrading an essential part of your kitchen and enjoy your newly installed Kohler faucet for years to come!
Connect the Water Supply Lines
Now it’s time to connect the water supply lines to your new Kohler kitchen faucet. You’ll need an adjustable wrench, a plumber’s putty, and possibly a basin wrench.
- Turn off the water supply under the sink by closing the shutoff valves. Place a bucket underneath to catch any remaining water in the lines.
- Apply the plumber’s putty around the base of the faucet to form a seal between the faucet and the countertop. Press the faucet into place over the hole in the countertop.
- Hand-tighten the mounting nuts that hold the faucet in place. Then tighten them with the adjustable wrench, alternating between nuts until snug.
- Connect the hot and cold water supply lines to the correct hot and cold ports on the faucet base. The hot water line will typically have a red fitting while the cold line has a blue fitting. If your existing lines don’t match the faucet ports, you may need to purchase different supply line hoses.
- Use the adjustable wrench to tighten the supply line nuts. Make sure the lines are not kinked, twisted, or pinched.
- Turn the water back on at the shutoff valves and check for any leaks in the lines or connections under the sink. Tighten as needed.
- Test your new Kohler kitchen faucet to ensure proper hot and cold water flow and pressure. Make any final adjustments to the water temperature if needed.
- Dispose of any remaining plumber’s putty around the base of the faucet for a clean finish.
If you run into any issues installing your Kohler kitchen faucet, don’t hesitate to contact Kohler’s customer service for additional support. With some patience and the proper tools, you’ll be enjoying your new faucet in no time. Let the dishwashing begin!
Turn the Water Back on and Check for Leaks
You’re almost done! The final step is turning the water back on and checking for any leaks.
Turn Off the Water Supply
To avoid flooding your kitchen, turn off the water supply to your sink before installing the faucet. Locate the shutoff valves under or near your sink and turn them clockwise to shut off the water. Have a towel ready in case any water is left in the pipes.
Connect the Water Lines
Hand-tighten the water supply lines to the hot and cold water shutoff valves. Then connect the other end of the lines to your new Kohler faucet, making sure the hot water line goes to the hot water inlet and the cold water line to the cold water inlet. Use an adjustable wrench to firmly tighten all connections.
Turn the Water Back On
Slowly turn the water back on using the shutoff valves. Check all connections for drips or leaks. Tighten as needed. Run the hot and cold water for a few minutes to clear any debris.
Test Your New Faucet
Turn on your new Kohler kitchen faucet to ensure proper flow and temperature. Check that the sprayer hose (if you have one) is working well. Make any final tighten to connections if needed.
Call a Plumber if Needed
If you continue to have leaks or other issues after turning the water back on and testing your new faucet, it’s best to call a licensed plumber to inspect the installation. Small leaks can lead to big water damage over time if left unaddressed. It’s always better to be safe than sorry in these situations.
Congratulations, you now have a stylish and fully-functional Kohler kitchen faucet! Enjoy your new fixture and the refreshed look it provides your kitchen. Let the cooking and entertaining begin!
Conclusion
So there you have it, your new Kohler kitchen faucet is installed and ready to use. Not too tricky, was it? Now you can enjoy your upgraded kitchen sink and the stylish new centerpiece it has become. Every time you turn the water on or off, you’ll feel a little burst of satisfaction knowing you handled it yourself. And if your friends comment on how professional it looks, feel free to boast about your plumbing skills – you’ve earned it! With the savings from not hiring a plumber, treat yourself to something nice. You deserve it, Mr/Ms. DIY!
More kitchen Faucets recommendations
- Top 10 The Best Luxury Kitchen Faucets for Every Budget
- What Is the Highest GPM Kitchen Faucet? Meet the Moen Arbor
- Best Gold Kitchen Faucets of 2023: Top 5 Picks for a Luxurious Look
- Waypoint Cabinets vs KraftMaid: Which is the Better Choice?
- American Woodmark Cabinets: Real Customer Reviews
- Midea Appliances Reviews: What Customers Are Saying
- The Best High-End Kitchen Faucets for Every Budget
- Allen and Roth Kitchen Faucet With LED Light:
- How to install a Moen Kitchen Faucet With Sprayer