We may earn money or products from the companies mentioned in this post.
Repairing a kitchen faucet handle typically involves tightening a loose handle or replacing worn-out components. Prompt repair prevents water leaks and further damage to the faucet.
Having a malfunctioning kitchen faucet handle can be a minor inconvenience that leads to bigger issues if ignored. Kitchen faucets are heavily used items in the house, making them prone to wear and tear over time. A wobbly handle or difficulty in controlling the water flow are common signs indicating a need for repair.
Tackling these issues early on can save homeowners from potential water waste and increased utility bills. In carrying out repairs, it’s essential to identify the faucet type, as this determines the procedure and the parts needed. DIY enthusiasts find that fixing a kitchen faucet handle can be a straightforward task, requiring only basic tools and a bit of know-how. However, consulting a professional might be the best course of action for more complex systems or when in doubt.
Introduction
Tackling a leaky or malfunctioning kitchen faucet handle can be a do-it-yourself fix. Our guide demystifies the repair process, ensuring your faucet operates smoothly with minimal hassle.
A leaky or malfunctioning kitchen faucet handle can throw a wrench in your daily routine. Addressing this inconvenience promptly can save you from the nuisance of a perpetually damp countertop and the sting of a high water bill. Let’s dive into the nuts and bolts of kitchen faucet handle repair, ensuring that you can tackle this common household issue confidently.
Understanding Faucet Handle Mechanics
Faucet technology may seem complex at first glance, but the mechanics behind it are quite straightforward. Essentially, when you turn a faucet handle, you’re controlling a valve that regulates water flow. Over time, the components can wear down, resulting in leaks or stiffness when operating the handle.
Keep in mind that there are different types of faucets – such as compression, cartridge, ball, and disc – each with its own unique repair process. Identifying your faucet type is the first step to a successful repair job.
Identifying Common Handle Issues
- Loose handle: This is often due to a screw that has gradually unwound over time.
- Hard-to-turn handle: Mineral deposits can build up, requiring cleaning or replacement of parts.
- Dripping handle: A worn-out O-ring or washer usually needs replacing to achieve a tighter seal.
Recognizing what’s wrong with your kitchen faucet handle is central to fixing the issue effectively. By pinpointing these typical problems, you can focus your repair efforts and restore your faucet’s functionality faster.
Gathering Necessary Tools And Parts
Before embarking on your repair journey, assembling the right tools and replacement parts is crucial. Here is what you might need:
- Screwdrivers: To loosen and tighten screws.
- Wrench: For removing the faucet handle and adjusting parts.
- Replacement parts: Such as O-rings, washers, or a full handle kit, depending on your faucet’s needs.
Equipping yourself properly not only makes the repair process smoother but also prevents potential damage to your faucet and sink.
Step-by-step Repair Guide
Repairing a faulty kitchen faucet handle doesn’t require the expertise of a professional plumber. By following some simple steps, most issues can be resolved:
- Shut off the water supply to avoid a miniature flood in your kitchen.
- Disassemble the handle carefully to uncover the root of the problem.
- Replace any worn or damaged components, and reassemble the faucet.
- Test the handle to ensure everything is operating as it should.
By taking a methodical approach, you can have your faucet handle functioning like new in no time.
Assessing The Problem
Diagnosing the root issue with a malfunctioning kitchen faucet handle is the first step towards a sustainable repair. Recognizing signs of wear or damage enables homeowners to determine whether a simple fix or full replacement is necessary.
Fixing a leaky or malfunctioning kitchen faucet can often feel like an intimidating task. But with a little know-how and the right approach, you can pinpoint the issue and get it sorted in no time. Let’s get our hands dirty and dive into the process of assessing what’s wrong with your faucet handle.
Understanding Your Faucet Type
Before you grab your toolbox, it’s essential to recognize what type of faucet you have. This knowledge will steer your repair efforts in the right direction:
- Compression Faucet: Known for separate hot and cold water handles.
- Ball Type Faucet: Features a single handle that moves over a rounded ball-shaped cap right above the base of the faucet spout.
- Cartridge Faucet: Can have one or two handles but doesn’t require much force to turn on and off.
- Ceramic-Disk Faucet: Identified by one handle that can be maneuvered up and down to control water flow and left or right to adjust the temperature.
Spotting Common Handle Issues
With an understanding of your faucet type, let’s pinpoint some common handle problems. A malfunctioning kitchen faucet handle could be due to several factors:
- Loose Handle: Results in a wobbly or unresponsive handle.
- Cause: Usually caused by a loose screw at the handle’s base or worn-out components.
- Stiff Handle: Makes it hard to turn the handle.
- Cause: Often due to mineral deposits or corrosion within the handle mechanism.
- Leaky Handle: Water dripping from around the handle.
- Cause: This may be due to faulty O-rings, worn-out seals, or damaged valve seats.
Checking For Visible Damage
Now, visually inspect your faucet. Rub your fingers around the edges and feel for any cracks or wear. This step includes:
- Scrutinizing the handle and the base for crack lines or chips.
- Observing any mineral buildup which often appears as a white crusty substance.
- Ensuring that the handle is not only attached firmly but also moves smoothly without any unnatural resistance.
Testing Faucet Handle Movement
It’s time for a hands-on assessment:
Rotate the handle slowly, noticing any unusual resistance or ease that might hint at an underlying issue. Pay attention to:
- Any squeaking or grinding noises suggest the internal parts might be grating against each other unfavorably.
- The consistency of the water pressure as you turn the handle, looking for any unexpected drops or surges.
- Whether the handle has any ‘give’ or if it sticks before releasing the water flow.
Through these simple tests, you’re well on your way to diagnosing the problem and prepping for a successful faucet handle repair. By understanding what to look for, you’re turning this seemingly complex problem into a straightforward fix.
Tools And Materials
Embarking on a kitchen faucet handle repair requires specific tools and materials. Essential items include a set of Allen wrenches, screwdrivers, and replacement O-rings or washers, ensuring a smooth and successful fix.
Tackling a kitchen faucet handle repair can be a breeze with the right set of tools and materials at your disposal. Before you dive into the twisting and turning of nuts and screws, take a moment to gather everything you need.
Doing so will streamline the process and help you fix that wobbly handle or pesky leak in no time.
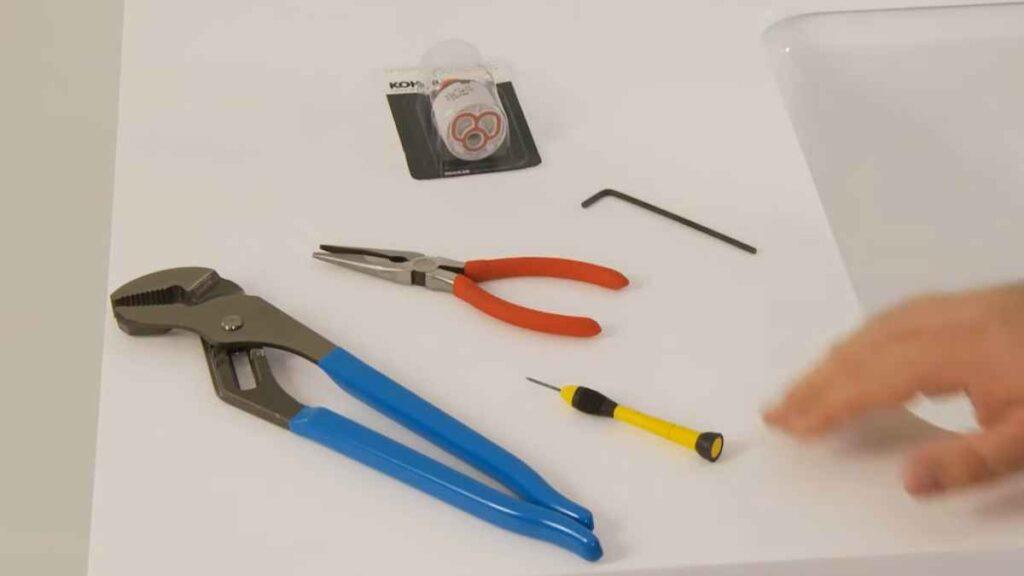
Essential Tools For The Job
A successful faucet handle repair starts with a collection of basic but crucial tools. Without these, you might find yourself making multiple trips to the hardware store or, worse, stuck with a dismantled faucet:
- Adjustable Wrench: For gripping and turning various-sized nuts and bolts.
- Allen Wrench Set: To adjust or remove handles that are secured with hex screws.
- Slip-joint Pliers: Handy for holding or twisting parts that may be too large for the wrench.
- Screwdriver Set (Flat-head and Phillips-head): To tackle different types of screws used in the faucet assembly.
Materials You Should Have On Hand
Before rolling up your sleeves, make sure you aren’t missing any vital materials:
- O-rings and Washers: These small parts are often the culprits behind leaks and should be replaced during a repair.
- Plumber’s Grease: This helps lubricate moving parts and seals to ensure smooth operation.
- Thread Seal Tape: For wrapping threaded joints, preventing leaks at connection points.
- Replacement Cartridge or Ball: Depending on the type of faucet, having a replacement cartridge or ball can resolve many common handle issues.
Armed with this toolkit and materials, you’re now prepared to tackle that kitchen faucet handle like a pro. Remember, patience is key, and rushing through the steps can lead to mistakes. Take it step by step, and your kitchen sink will be up and running in no time.
Step-by-step Repair Process
Embarking on a kitchen faucet handle repair ensures a leak-free, smoothly functioning fixture. This guide offers a methodical approach to fixing that wobbly handle, restoring your faucet’s efficiency, and extending its lifespan.
Identifying The Problem
Before diving into repairs, it’s crucial to understand what part of your kitchen faucet handle needs fixing. A loose handle, difficulty in turning, or a drip can each stem from different issues within the handle’s mechanism.
Gathering Necessary Tools
- Screwdriver: A tool for removing screws that hold the faucet handle in place.
- Allen wrench: Some faucet designs use hex screws, which require an Allen wrench for removal.
- Adjustable wrench: To hold or turn pipes and nuts, an adjustable wrench is essential.
Turn Off The Water Supply
Ensuring safety is paramount when starting any repair work. Begin by shutting off the water supply to the kitchen faucet to prevent any accidental water flow. This typically involves turning the valves beneath the sink clockwise until fully closed.
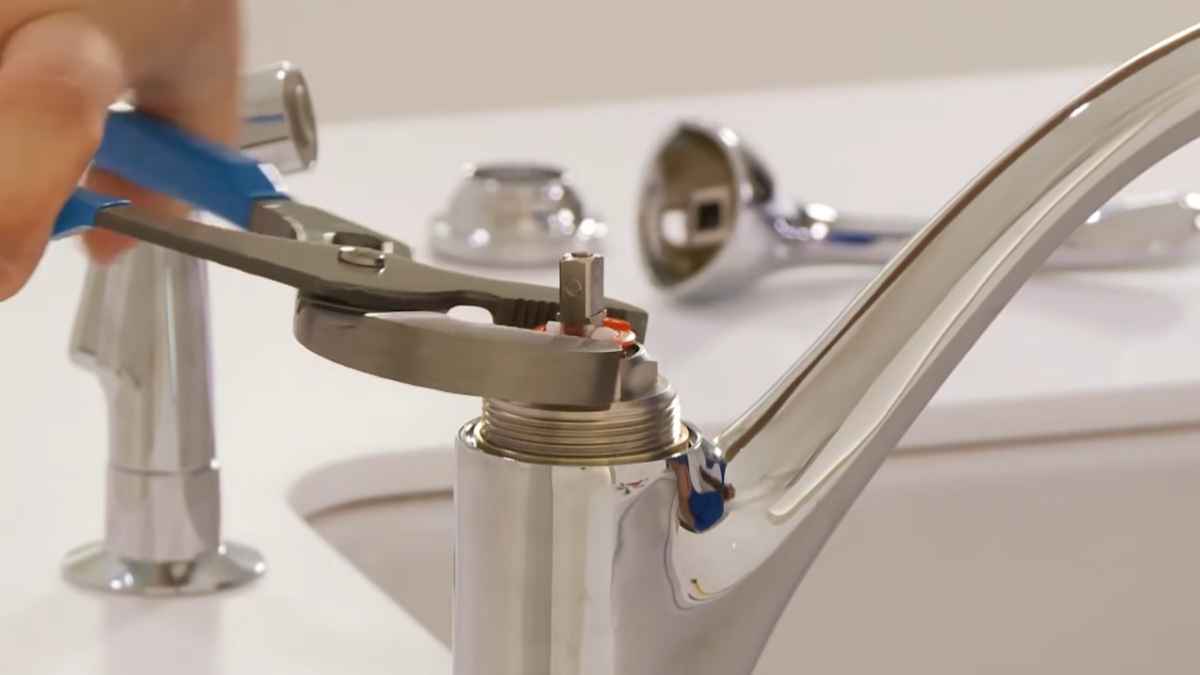
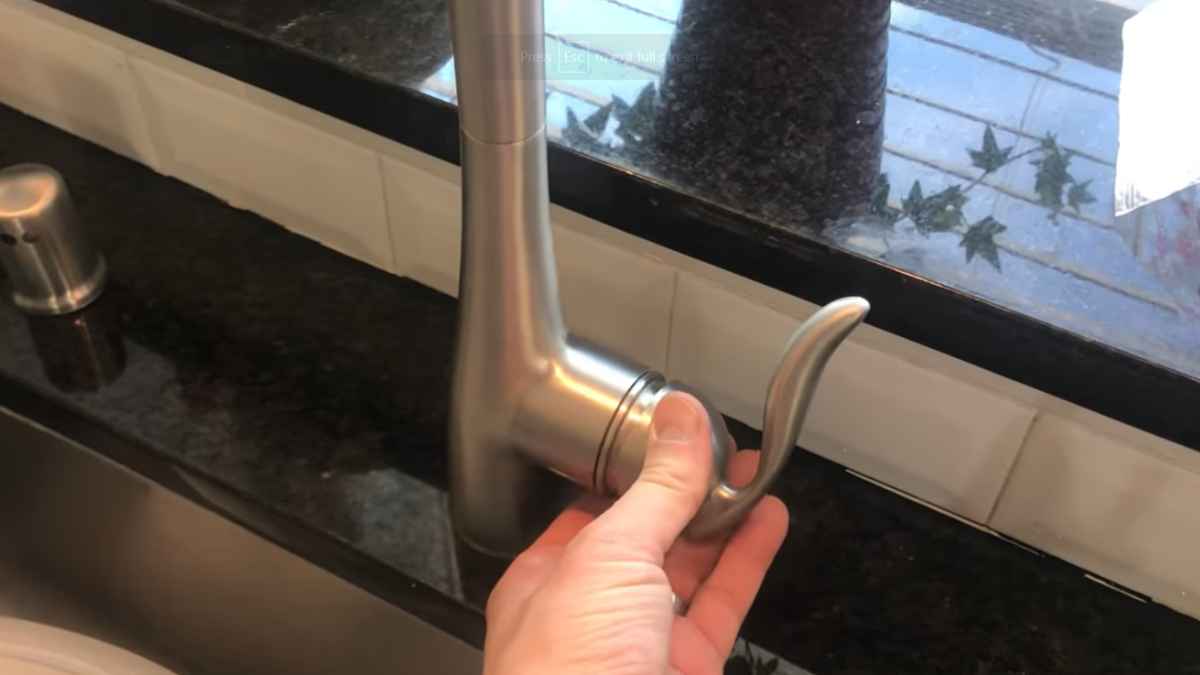
Dismantle The Faucet Handle
- Remove the cap: Find the decorative cap on top of the faucet handle, and carefully pry it off with a flathead screwdriver.
- Unscrew the handle: Once the cap is off, use the appropriate screwdriver or Allen wrench to remove the screw holding the handle in place.
Inspecting The Cartridge Or Valve
With the handle removed, examine the cartridge or valve. Look for signs of wear, such as cracks or mineral build-up, which could be causing the handle to malfunction. Determine whether cleaning or replacing is necessary.
Replacing Or Cleaning Parts
- Cleaning: If parts are clogged with debris, gently clean them with vinegar and a soft brush to remove buildup.
- Replacing: For worn or damaged parts, head to your local hardware store with the faulty piece to find a suitable replacement.
Reassemble The Faucet Handle
After cleaning or replacing the necessary parts, it’s time to put the faucet handle back together. Reverse the dismantling process, taking care to securely fasten each component. Double-check that everything is tight to prevent future leaks.
Test The Faucet Handle
Once everything is back in place, slowly turn the water supply back on and test the handle’s functionality. The faucet should operate smoothly, and any previous issues should be resolved.
By following these steps, you can tackle kitchen faucet handle repairs with confidence and restore proper function to your kitchen sink. Remember to always keep safety in mind and consult with a professional if you are unsure about any step in the repair process.
Testing And Troubleshooting
Experiencing a wobbly or leaking kitchen faucet handle can disrupt your daily routine. Dive into the essentials of testing for common issues and mastering troubleshooting techniques to ensure a smoothly functioning faucet. Repairing a kitchen faucet handle becomes straightforward with the right approach.
Understanding Your Kitchen Faucet Mechanism
Before diving into repairs, it’s crucial to grasp how your kitchen faucet functions. Most kitchen faucets have a simple mechanism involving a cartridge, handle, and series of seals. When the handle is not operating smoothly or there’s a leak, the problem could lie in any one of these components.
Properly diagnosing the issue is the first step towards a successful faucet handle repair.
Preparing For Troubleshooting
Troubleshooting a faulty kitchen faucet handle requires some preparation:
- Turn off the water supply: Prevent water from gushing by shutting off the supply valves under the sink.
- Gather necessary tools: A screwdriver, adjustable wrenches, and replacement parts like O-rings and valves should be within reach.
- Clear the workspace: Ensure a clutter-free work area to avoid losing any small parts during the repair process.
Identifying Common Issues
Some issues are more prevalent than others when dealing with kitchen faucet handles. Look out for:
- Loose handle: A handle that wiggles may simply need tightening.
- Hard to turn: Mineral deposits can build up inside, making it difficult to operate the handle.
- Dripping faucet: Worn-out seals or O-rings often cause persistent drips and require replacement.
Testing The Handle Movement
Once you’ve dealt with common issues, test the handle’s movement:
- Move handle smoothly: Check if the handle now operates without resistance.
- Feel for stiffness: Any remaining stiffness in the handle may indicate a need for further lubrication or adjustment.
- Listen for unusual sounds: Grinding or squeaking sounds can point to deeper mechanical issues.
Addressing Seal And O-ring Problems
If your faucet handle is still not up to par, inspecting the seal and O-ring might reveal the culprit. A deteriorated O-ring or a compromised seal can result in leakage and handle malfunctions. Replacing these components is often a straightforward process but requires careful handling to ensure the new parts are fitted correctly.
Reassembling And Finishing Up
After addressing the handle’s issues, reassembling should be performed with attention to detail:
- Ensure tight connections: Double-check all fittings and screws to prevent future leaks.
- Restore water supply: With everything back in place, slowly turn on the water supply to check for leaks.
- Final testing: Operate the handle through its full motion to ensure the repair is successful.
Following these systematic steps should resolve most kitchen faucet handling problems. Remember that a meticulously executed repair not only ensures a functioning faucet but also contributes to the longevity of its mechanisms.
Preventive Maintenance Tips
Regular maintenance of your kitchen faucet handle can prevent inconvenient breakdowns. Tackling leaks and stiffness early with simple repairs ensures smooth operation and extends the fixture’s lifespan.
Struggling with a kitchen faucet that just won’t cooperate can be a real headache. The drip, drip, drip you hear is not just irritating—it’s the sound of water and money tricking down the drain. Thankfully, you can avoid the common problems that lead to needed repairs with some simple, preventive maintenance.
Regular Cleaning And Inspection
It might seem like a no-brainer, but giving your faucet a thorough cleaning on a consistent basis can go a long way. Hard water and mineral deposits can lead to a buildup that affects the functionality of your faucet handles.
By removing the handle and using a combination of white vinegar and water, you can properly maintain the surfaces and inner workings of your kitchen faucet.
Lubricate Moving Parts
- Check for smooth operation: Before lubricating, turn the handle gently. It should move easily without any grinding or resistance.
- Use the right type of lubricant: Select a silicone-based lubricant that is safe for use on kitchen fixtures. This will help in keeping the handle action smooth.
- Apply sparingly: A small amount of lubricant goes a long way. Apply it to any exposed moving parts after cleaning to keep everything operating smoothly.
Diligently following these steps can ensure that the kitchen faucet handle remains in good, working condition, forestalling the annoyance and inconvenience of unexpected repairs. Remember, regular maintenance is not just about preventing problems; it’s about ensuring the longevity and performance of your kitchen fixtures.

Credit: www.homedepot.com
Frequently Asked Questions For Kitchen Faucet Handle Repair
How Do I Fix A Leaky Kitchen Faucet Handle?
Can I Repair A Kitchen Faucet Handle Myself?
What Causes A Kitchen Faucet Handle To Leak?
When Should I Replace My Kitchen Faucet Handle?
Conclusion
Wrapping up, and tackling a leaky kitchen faucet handle can be straightforward with the right tools and guidance. Remember to shut off the water supply, disassemble the handle carefully, and replace any worn components. Regular maintenance keeps your faucet functioning smoothly and can save you from costly plumbing services.
Keep these tips handy for a hassle-free repair experience.
More kitchen Faucets recommendations
- 8 Best Signature Hardware Kitchen Faucets: Elegance Meets Functionality
- Delta Cassidy Kitchen Faucet: Elegance Meets Functionality
- RV Kitchen Faucet Replacement Parts: Find What You Need, Fast!
- Kohler Kitchen Faucets with Sprayer: Stylish, Functional, and Durable
- Kohler Kitchen Faucet Cartridge Replacement: Easy Step-by-Step Guide